IDCFクラウドでCentOS 7.3→7.4とHTTP/2(ALPN)対応してみた
cloudcore VPSから移動先を探していて、IDCFクラウドがお求めやすく(無料チケットが豊富で試せる期間が多い)いろいろやってみました
IDCFクラウド
https://www.idcf.jp/cloud/
旧環境と新環境、その他もろもろについて
CloudCore VPS 新規募集停止
・CentOS 5.x
IDCFクラウド
・CentOS 7.4
CentOS 5.xいつまでも使ってただめだろうとか、TLS 1.0が 2018年6月末までなので、OpenSSLどうするとかいろいろありました(自分でコンパイル?)
CentOSとopensslの関係
CentOS 5.x openssl 0.9.8
CentOS 6.x openssl 1.0.1
CentOS 7.0 ~ 7.3 openssl 1.0.1
CentOS 7.4 openssl 1.0.2
opensslサポート状況 TLS対応とか
× openssl 0.9.8 2015年12月31日サポート終了 TLS 1.0
× openssl 1.0.0 2015年12月31日サポート終了
× openssl 1.0.1 2016年12月31日サポート終了 TLS 1.0 1.1 1.2
〇 openssl 1.0.2 2019年12月31日サポート終了 TLS 1.0 1.1 1.2 ALPN対応(HTTP/2)
〇 openssl 1.1.0 2018年08月31日サポート終了 TLS 1.0 1.1 1.2 (1.0.2に対して後方互換性がない)
https://www.openssl.org/policies/releasestrat.html
CentOS 7.4の素晴らしさわかります?
CentOS 7.3から7.4に
IDCFクラウドではCentOS 7.3が提供されているので、7.3をさくっと起動します
毎月500円で動かすなら
マシンタイプ light.S1 (200円/月)
おススメテンプレート CentOS 7.3
ボリューム 15GB (1GB*20円 300円/月)
※ISOイメージからインストールできるなら、ボリューム容量を15GBから減らせるので300円(5GB)も可能
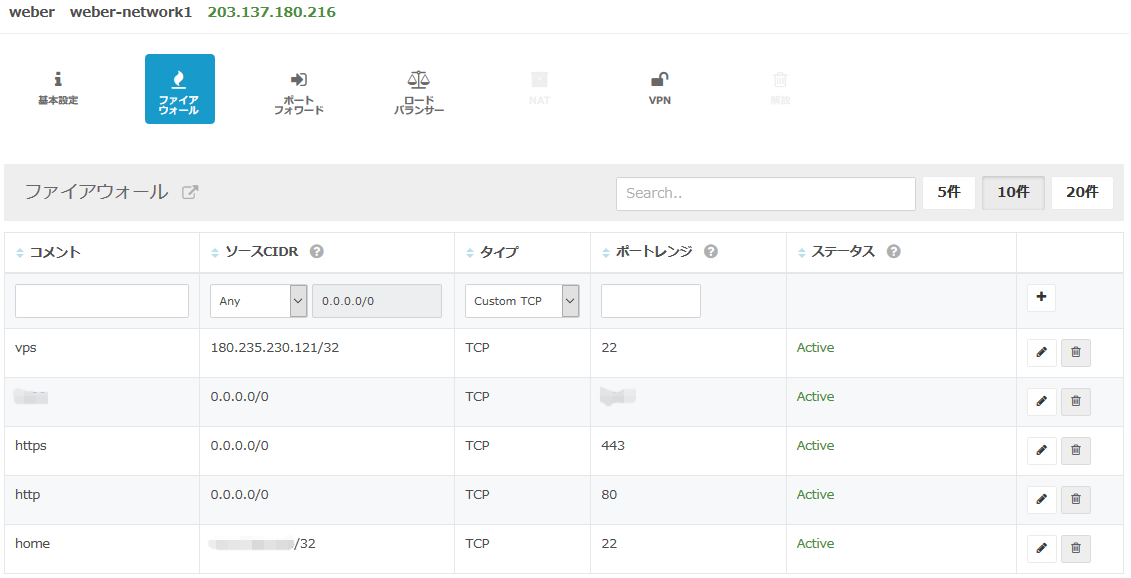
次にSSHでログインできるように、ファイアウォールとポートフォワードの設定
ファイアウォールの設定
細かく出来ます。任意のIPからのみSSH使えるようにして、httpとhttpsはどこからでもOKに
ポートフォワードの設定
22番を22番、80番を80番、443番を443番に

SSHでログイン出来たら
# vi /etc/yum.repos.d/CentOS-CR.repo
enabled=1
0から1に変更
# yum clean all
# yum update
で7.4にアップデート。Kernelとかあがるので、アップデート後はrebootしましょう
# cat /etc/redhat-release
CentOS Linux release 7.4.1708 (Core)
参考:sshでログインするまで
http://blog.noriaki.me/2014-10-16-idcf-cloud-initialize-tutorial
CentOSにswap設定
おススメテンプレートのCentOS 7.3では、メモリ1GBでswap領域が無いためswapを1GB作成(月20円)
・ボリューム作成で1GB 作成後、作成したボリュームをCentos7.4が動いているイメージにアタッチ
・アタッチしたイメージを反映させるために一度再起動
SSHでログインして
# fdisk /dev/sdb
Welcome to fdisk (util-linux 2.23.2).
Changes will remain in memory only, until you decide to write them.
Be careful before using the write command.
Device does not contain a recognized partition table
Building a new DOS disklabel with disk identifier 0x07d0fd9c.
コマンド (m でヘルプ): n
Partition type:
p primary (0 primary, 0 extended, 4 free)
e extended
Select (default p): p
パーティション番号 (1-4, default 1):
最初 sector (2048-2097151, 初期値 2048):
初期値 2048 を使います
Last sector, +sectors or +size{K,M,G} (2048-2097151, 初期値 2097151):
初期値 2097151 を使います
Partition 1 of type Linux and of size 1023 MiB is set
コマンド (m でヘルプ): t
Selected partition 1
Hex code (type L to list all codes): 82
Changed type of partition 'Linux' to 'Linux swap / Solaris'
コマンド (m でヘルプ): p
Disk /dev/sdb: 1073 MB, 1073741824 bytes, 2097152 sectors
Units = sectors of 1 * 512 = 512 bytes
Sector size (logical/physical): 512 bytes / 512 bytes
I/O サイズ (最小 / 推奨): 512 バイト / 512 バイト
Disk label type: dos
ディスク識別子: 0x07d0fd9c
デバイス ブート 始点 終点 ブロック Id システム
/dev/sdb1 2048 2097151 1047552 82 Linux swap / Solaris
コマンド (m でヘルプ): w
パーティションテーブルは変更されました!
ioctl() を呼び出してパーティションテーブルを再読込みします。
ディスクを同期しています。
スワップの作成
# mkswap /dev/sdb1
スワップ空間バージョン1を設定します、サイズ = 1047548 KiB
ラベルはありません, UUID=d45faf3e-e9b2-494a-93d1-14ea3f40ca24
最後の行にUUIDを追加
# vi /etc/fstab
UUID=d45faf3e-e9b2-494a-93d1-14ea3f40ca24 swap swap defaults 0 0
反映
# swapon -a
確認
# swapon -s
Filename Type Size Used Priority
/dev/sdb1 partition 1047548 0 -1
参考:
IDCFクラウドのCentOS7でSwapを使う
http://blog.1783.org/2015/05/idcfcloud-swap/
nginxをHTTP2対応させる
nginxのインストール
mainline、stableどちらを使うかでbaseurlが変わります
# vi /etc/yum.repos.d/nginx.repo
[nginx]
name=nginx repo
#baseurl=http://nginx.org/packages/centos/7/$basearch/
baseurl=http://nginx.org/packages/mainline/centos/7/$basearch/
gpgcheck=0
enabled=0
# yum install nginx --enablerepo=nginx
mainlineは1.13.5
# nginx -V
nginx version: nginx/1.13.5
built by gcc 4.8.5 20150623 (Red Hat 4.8.5-11) (GCC)
built with OpenSSL 1.0.1e-fips 11 Feb 2013
TLS SNI support enabled
configure arguments: --prefix=/etc/nginx --sbin-path=/usr/sbin/nginx --modules-path=/usr/lib64/nginx/modules --conf-path=/etc/nginx/nginx.conf --error-log-path=/var/log/nginx/error.log --http-log-path=/var/log/nginx/access.log --pid-path=/var/run/nginx.pid --lock-path=/var/run/nginx.lock --http-client-body-temp-path=/var/cache/nginx/client_temp --http-proxy-temp-path=/var/cache/nginx/proxy_temp --http-fastcgi-temp-path=/var/cache/nginx/fastcgi_temp --http-uwsgi-temp-path=/var/cache/nginx/uwsgi_temp --http-scgi-temp-path=/var/cache/nginx/scgi_temp --user=nginx --group=nginx --with-compat --with-file-aio --with-threads --with-http_addition_module --with-http_auth_request_module --with-http_dav_module --with-http_flv_module --with-http_gunzip_module --with-http_gzip_static_module --with-http_mp4_module --with-http_random_index_module --with-http_realip_module --with-http_secure_link_module --with-http_slice_module --with-http_ssl_module --with-http_stub_status_module --with-http_sub_module --with-http_v2_module --with-mail --with-mail_ssl_module --with-stream --with-stream_realip_module --with-stream_ssl_module --with-stream_ssl_preread_module --with-cc-opt='-O2 -g -pipe -Wall -Wp,-D_FORTIFY_SOURCE=2 -fexceptions -fstack-protector-strong --param=ssp-buffer-size=4 -grecord-gcc-switches -m64 -mtune=generic -fPIC' --with-ld-opt='-Wl,-z,relro -Wl,-z,now -pie'
このOpenSSLのバージョンではALPN対応してないのでHTTP/2は使えません(ALPN対応は1.0.2~)
モジュールインストール
# yum install libxslt-devel gd-devel GeoIP-devel --enablerepo=epel
ソースを取ってきてコンパイル ./configureオプションはnginx -Vした上記を利用
# wget http://nginx.org/download/nginx-1.13.5.tar.gz
# tar zxf nginx-1.13.5.tar.gz
# cd nginx-1.13.5
# ./configure 長いので省略(上記configure argumentsの値)
# make
# ll objs/
合計 9488
-rw-r--r-- 1 root root 60769 9月 21 21:11 Makefile
-rw-r--r-- 1 root root 22469 9月 21 21:11 autoconf.err
-rwxr-xr-x 1 root root 9490736 9月 21 21:13 nginx
-rw-r--r-- 1 root root 5304 9月 21 21:13 nginx.8
-rw-r--r-- 1 root root 9309 9月 21 21:11 ngx_auto_config.h
-rw-r--r-- 1 root root 657 9月 21 21:11 ngx_auto_headers.h
-rw-r--r-- 1 root root 10556 9月 21 21:11 ngx_modules.c
-rw-r--r-- 1 root root 95472 9月 21 21:13 ngx_modules.o
drwxr-xr-x 9 root root 91 9月 21 21:07 src
作成できたファイルを確認
# ./objs/nginx -V
nginx version: nginx/1.13.5
built by gcc 4.8.5 20150623 (Red Hat 4.8.5-16) (GCC)
built with OpenSSL 1.0.2k-fips 26 Jan 2017
TLS SNI support enabled
configure arguments: 長いので省略(上記configure argumentsの値)
無事OpenSSL 1.0.2kになりました
ファイルを置き換えます
# cp /usr/sbin/nginx /usr/sbin/nginx_org
# systemctl stop nginx
# cp objs/nginx /usr/sbin/nginx
# systemctl start nginx
これでHTTP/2対応完了!
参考:
openssl と nginx をソースからビルドして ALPN 対応させる
https://blog.shiftky.net/nginx-alpn-http2/
Unix Bench 5.1.3スコア
CloudCore VPSとIDCFクラウドを比較してみました
CloudCore VPS
1 CPU in system; running 1 parallel copy of tests
Dhrystone 2 using register variables 8674951.7 lps (10.0 s, 7 samples)
Double-Precision Whetstone 998.7 MWIPS (9.9 s, 7 samples)
Execl Throughput 3691.8 lps (30.0 s, 2 samples)
File Copy 1024 bufsize 2000 maxblocks 619218.6 KBps (30.0 s, 2 samples)
File Copy 256 bufsize 500 maxblocks 210755.0 KBps (30.0 s, 2 samples)
File Copy 4096 bufsize 8000 maxblocks 647011.8 KBps (30.0 s, 2 samples)
Pipe Throughput 1768586.4 lps (10.0 s, 7 samples)
Pipe-based Context Switching 308542.9 lps (10.0 s, 7 samples)
Process Creation 6974.4 lps (30.0 s, 2 samples)
Shell Scripts (1 concurrent) 4367.4 lpm (60.0 s, 2 samples)
Shell Scripts (8 concurrent) 599.4 lpm (60.1 s, 2 samples)
System Call Overhead 2650136.8 lps (10.0 s, 7 samples)
System Benchmarks Index Values BASELINE RESULT INDEX
Dhrystone 2 using register variables 116700.0 8674951.7 743.4
Double-Precision Whetstone 55.0 998.7 181.6
Execl Throughput 43.0 3691.8 858.5
File Copy 1024 bufsize 2000 maxblocks 3960.0 619218.6 1563.7
File Copy 256 bufsize 500 maxblocks 1655.0 210755.0 1273.4
File Copy 4096 bufsize 8000 maxblocks 5800.0 647011.8 1115.5
Pipe Throughput 12440.0 1768586.4 1421.7
Pipe-based Context Switching 4000.0 308542.9 771.4
Process Creation 126.0 6974.4 553.5
Shell Scripts (1 concurrent) 42.4 4367.4 1030.0
Shell Scripts (8 concurrent) 6.0 599.4 998.9
System Call Overhead 15000.0 2650136.8 1766.8
========
System Benchmarks Index Score 900.4
IDCFクラウド light.S1(東日本リージョン2 weber)
1 CPU in system; running 1 parallel copy of tests
Dhrystone 2 using register variables 12739062.4 lps (10.2 s, 7 samples)
Double-Precision Whetstone 1501.7 MWIPS (15.1 s, 7 samples)
Execl Throughput 1455.1 lps (29.8 s, 2 samples)
File Copy 1024 bufsize 2000 maxblocks 376632.9 KBps (30.5 s, 2 samples)
File Copy 256 bufsize 500 maxblocks 107343.2 KBps (30.2 s, 2 samples)
File Copy 4096 bufsize 8000 maxblocks 1023327.2 KBps (30.2 s, 2 samples)
Pipe Throughput 733096.5 lps (10.2 s, 7 samples)
Pipe-based Context Switching 141371.9 lps (10.3 s, 7 samples)
Process Creation 4401.8 lps (30.1 s, 2 samples)
Shell Scripts (1 concurrent) 1892.8 lpm (60.1 s, 2 samples)
Shell Scripts (8 concurrent) 258.0 lpm (60.2 s, 2 samples)
System Call Overhead 1023259.6 lps (10.2 s, 7 samples)
System Benchmarks Index Values BASELINE RESULT INDEX
Dhrystone 2 using register variables 116700.0 12739062.4 1091.6
Double-Precision Whetstone 55.0 1501.7 273.0
Execl Throughput 43.0 1455.1 338.4
File Copy 1024 bufsize 2000 maxblocks 3960.0 376632.9 951.1
File Copy 256 bufsize 500 maxblocks 1655.0 107343.2 648.6
File Copy 4096 bufsize 8000 maxblocks 5800.0 1023327.2 1764.4
Pipe Throughput 12440.0 733096.5 589.3
Pipe-based Context Switching 4000.0 141371.9 353.4
Process Creation 126.0 4401.8 349.4
Shell Scripts (1 concurrent) 42.4 1892.8 446.4
Shell Scripts (8 concurrent) 6.0 258.0 430.0
System Call Overhead 15000.0 1023259.6 682.2
========
System Benchmarks Index Score 564.5
料金が11644円と6240円、十分ではないでしょうか?
IDCFクラウドの全リージョン全プランをUnixBenchしてみた
http://qiita.com/CloudRemix/items/73c2accbd3708906cec5
UnixBenchでベンチマーク
http://blog.idcf.jp/entry/cloud/unixbench/
移動させてみると管理画面サクサク動くように、もっとサクサクにするならDBを+500円で分けると良いかも
CloudCoreだと1.5sかかっていたのが1.1sに0.4s短縮され、反応も良くIDCFクラウド良いですね

http://stats.pingdom.com/813qdkn2tyso/778887
バックアップはAmazon S3互換のオブジェクトストレージ に入れてます(50GBまで無料)
オブジェクトストレージ 料金・仕様
https://www.idcf.jp/cloud/storage/spec.html

